
Construction text
 Main menu: Construction – Text >
  Construction text.
Ribbon: Construction – Symbols > Construction text.
Toolbar: Text > Construction text.
 Command line: SPDTEXT.
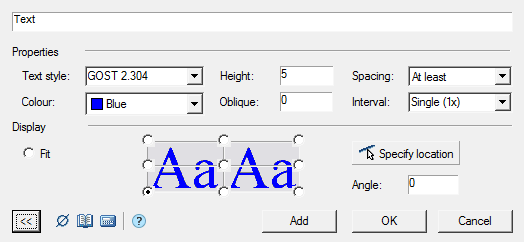
Dialog

An expanded view of the dialog box with text adjustment tools is enabled by clicking the button  .
.
Procedure
1. Enter the required text in the input field.
2. To insert special characters, use the “Insert special symbol” button.
3. To insert text from a notebook, use the “Notebook” button.
4. To insert the calculation result, use the “Calculator” button.
5. In the “Properties” toolset, choose a text style and options.
*Text style – text style.
*Height – text height.
*Colour – text color
*Oblique – gradient of text in degrees.
*Spacing – serves to control the intercharacter spacing during automatic text compression, if the “Fit” switch is set.
*At least – compresses the text, respecting the exact value of the spacing between the characters set for the selected text style.
*Exactly – shrinks the text, automatically decreasing or increasing the character spacing to fit the line exactly within the specified input area.
Interval – determines the spacing between adjacent lines of text, inserted one by one using the “Add” button.
6. In the “Display” toolset, set the text alignment and position options.
*Fit – the text is placed inside the selected area in the drawing. If the line length exceeds the size of the input area, the text is automatically compressed.
*Align to point – the text is aligned to the point specified by the user. Click on the appropriate radio button in the graphics area:
*Button  – is intended to indicate in the drawing the insertion point of the text line and the angle of rotation. If the “Fit” radio button is selected, then after specifying the insertion point, you must also select the width of the text input area.
*Angle – the value of the angle of rotation of the text in degrees.
7. Click the “Add” button to insert a text string. Click “OK” or “Cancel” to exit the looping command.
Post your comment on this topic.