
New Image from Selection
 Ribbon: Raster – File > New Image from selection
Menu: Raster – New Image from Selection
Toolbar: Raster –
 Command line: NEWRASTERFROMSELECTION
Selection for new image can contains:
- raster images;
- vector objects.
When there is no selection, the operation will apply to all data in the current workspace.
When you select vector data, they are rasterized. Color of rasterized objects depends on color of the resulting raster image:
- Monochrome images – rasterized objects will have color of monochrome image.
- Color Image – rasterized objects will have original color.
How to create new image from selection
- Select objects and run New Image from Selection command;
- Set options in New Image from Selection dialog.
![]()
- Click OK.
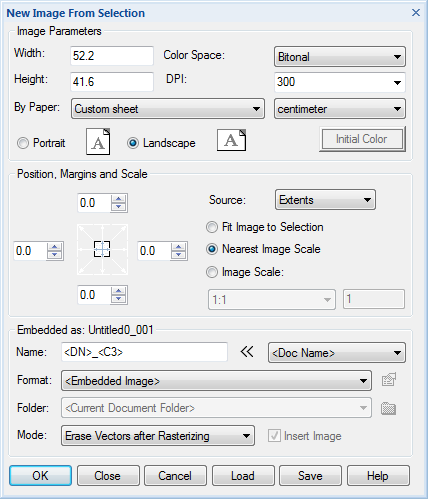
New Image from Selected dialog settings:
Image Parameters

| Option | Description |
|---|---|
| Width Height | Specify width and height for the new image. |
| By Paper | Choose from the list of standard paper sizes. |
| Color Space: | Specify color space – monochrome, grayscale, indexed or TrueColor. By default, the type with the highest color depth is suggested. If you have monochrome and color raster data, set the type to match the color raster. |
| DPI | Set resolution in DPI (dots per inch). |
| Portrait Landscape | Select orientation. |
| Initial color | Choose background color for color images. |
If your selection contains raster images it’s better to set Resolution and Color Space not lower than best raster image to avoid quality reduction. For example, if you have raster grayscale raster image with 300 dpi, you should set Grayscale or TrueColor, and Resolution not lower than 300 dpi.
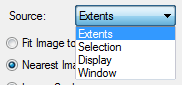
Source
Select objects/area for rasterization:
| Option | Description |
|---|---|
| Extents | Rasterizes all objects in the drawing’s current space. |
| Selection | Rasterizes preselected objects. |
| Display | Rasterizes the current view of the graphic area. |
| Window | Selection of rasterized area with a rectangular frame. The area request is initiated immediately after selecting the Window option from the drop-down list. To redefine the rasterization area, use  button. button. |
Position, Margins and Scale
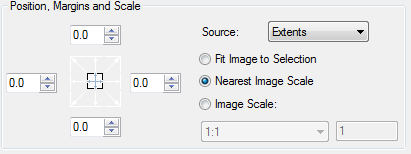
The image scale is set by selecting the desired position:
| Option | Description |
|---|---|
| Fit Image to Selection | Select scale to fit all objects to single image. |
| Nearest Image Scale | Select nearest standard scale to fit all objects to single image. |
| Image Scale | Set scale manually or from list |
Using Image Scale, you can create more than one image with specified scale.
In this case files will be created with order number. In this case, the results will be saved to separate files with adding page numbers to the set name:
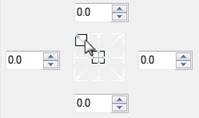 Set margins and image position. Positions the image relative to the sides of the fixed aspect. Enter indentation values in the section fields corresponding to the image sides. If the image fits into one page of the current format, you can set alignment to one of the sides by left-click on the arrow with the desired alignment type.
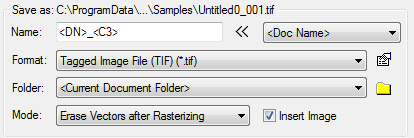
Embed or save as
| Option | Description |
|---|---|
| Name | Specify name for the image It can be done manually or using macros. When naming, you can use the macro definition in the name mask, either by entering it manually or by selecting a value from the list in the right field:
|
| Format | Select format for raster file: Embedded TIF, TIFF, BMP, JPG, JPEG, PNG, PCX, GIF. For some formats, additional options are available by  button. button. |
| Folder | Specify folder for raster image file. If Current document folder is selected – image will be saved to the same folder where drawing is stored. This option is unavailable, if the value was selected in the Format drop-down list. |
| Mode | Action with selected object after rasterization:
|
| Insert Image | Checking this box allows you to immediately insert the created raster image saved in a separate file into the original document. If the checkbox is not checked, only the raster image is saved to the specified folder, without inserting a link to it. The checkbox is unavailable if the value was selected in the Format drop-down list |
 button.
Finish your work
Buttons.

| Button | Function |
|---|---|
| OK | Create raster image. All dialog settings will be saved. |
| Close | Close the dialog with saving all dialog settings. Raster will be not created. |
| Cancel | Close dialog without changes. |
| Load | Load the dialog settings from the template file .tpl. |
| Save | Save the dialog settings to template file .tpl. |
Info: NanoCAD is a simple, inexpensive, and yet powerful, CAD app for personal computer, that allows a great user experience by providing top-level performance, full capability, a classic interface and native.dwg format support. nanoCAD has been built to deliver design and project documentation for all engineering purposes. nanoCAD includes a full suite of basic and advanced CAD tools for 2D/3D drafting and creating industry-standard DWG-compatible CAD files. Our freeware provides creative, collaborative and customizable features to boost your efficiency, and includes a number of API’s, allowing anything from routine task automation to complex CAD software development. You may try nanoCad for free, using the links below, and purchase later, if you like it.
Post your comment on this topic.