
Editing of Raster Images
Cropping of raster images
The size of raster image can be reduced to determined area by using Crop operations. This area can be determined by set clip of image or rectangle. Also, raster can be cropped automatically using procedure that determines empty image fields and crops them.
These operations apply to multiple images at once. For example you can crop pack of images by placing them on top of each other.
Automatic crop
Automatic crop trims the “empty” image field to the smallest possible rectangle that includes all raster data.
 Ribbon: Raster – Crop – Crop >
  Auto
Auto
Menu: Raster – Crop – Auto
Toolbar: Raster –
 Command line: CROPAUTO
1. Select raster to be processed on the screen. If there was no selected images, then the command processes all visible images placed in non-
locked layers.
2. Run the command.
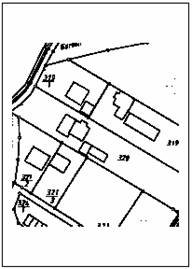
Original raster image
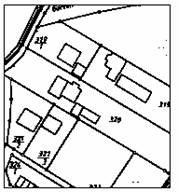
The result of the Automatic crop command
Auto crop by frame
If the raster has a frame, then the command automatically changes the size of raster by the frame.
Ribbon: Raster – Crop – Crop >  *By Frame
Menu: Raster – Crop – Auto by frame
Toolbar: Raster –
Command line:CROPBYFRAME
If the image has deformations, use the Deskew command for correct CROPBYFRAME behavior.
1. Select raster to be processed on the screen. If there was no selected images, then the command processes all visible images placed in non-
locked layers.
2. Run the command.
If the raster has no frame, then the result of Auto crop by frame is similar to the Crop → Auto.
Crop by Rectangle
Cropping can reduce an image size to a specified rectangular area size.
Ribbon: Raster – Crop >  By Rectangle
Menu: *Raster – Crop by Rectangle
Toolbar: Raster –
Command line: CROPBYRECT
1. Start the command.
2. Specify two opposite corners for the rectangular area in the raster.
Parts of an image outside the specified area are cropped.
Crop by clip
Ribbon: Raster – Crop >  By Clip
Menu: *Raster – By Clip
Toolbar: Raster –
Command line: CROPBYCLIP
To crop the raster by clip, the clip of the raster image should be predefined (Modify → Clip → New… command).
1. Select raster to be processed (visible and placed in non-locked layers). If there was no selected images, then the command processes all
visible images placed in non-locked layers that have the clip.
2. Run the command.
The raster image will be cropped by the clip of the raster image.
Info: NanoCAD is a user friendly, affordable, and yet professional, CAD program for personal computer, that provides an outstanding user experience by providing high performance, full capability, a classic interface and native.dwg format support. nanoCAD has been built to deliver design and project documentation for all industries. nanoCAD includes a full suite of basic and advanced CAD tools for 2D/3D design and creating industry-standard DWG-compatible CAD files. Our program provides innovative, collaborative and customizable features to boost your efficiency, and includes several API’s, allowing anything from routine task automation to complex CAD application development. You may try nanoCad for free, using the links below, and buy later, if you like it.
Post your comment on this topic.