
Import of Point Clouds
 Ribbon: Point Clouds > Point Cloud >
  Import
Menu: Insert >  Point cloud
Menu: Point clouds > Import
Toolbar: Point cloud >
 Command line: NPC_IMPORT
Inserts point clouds to the current drawing from LAS, BIN, PTX, PTS, PCD, TXT, XYZ, XYB files.
Import from Text Formats
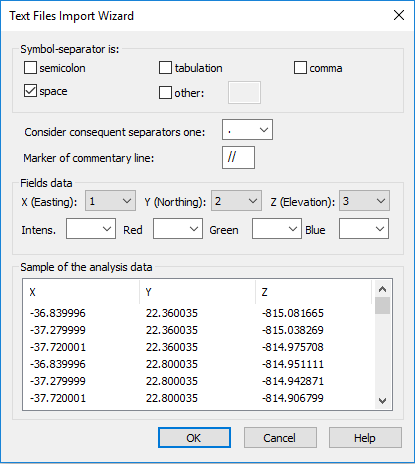
When importing point clouds from text files (TXT, XYZ, XYB), a separate import wizard dialogue is displayed. It allows you to set the data interpretation rules for the imported file.
Options:
Separator character
Specifies character that separates text file data. You can choose both predefined character (semicolon, tab character, comma, space), and set any other one.
- Consider consequent separators one: Specify a character used to separate whole and fractional parts of values
- Marker of commentary line: Specify a character used to comment lines. Commentary lines are not considered as data when imported. If a file contains no comments, you can leave default character.
Fields data
Specify correspondence of text file columns to certain data types: point coordinates by X, by Y and by Z, intensity value, point color in RGB (red, green, blue).
Example of the analysis data
Preview of text file data. The column title displays the type of data specified in Fields data section. After Text Files Import Wizard is closed, the main point clouds Import dialogue box opens.
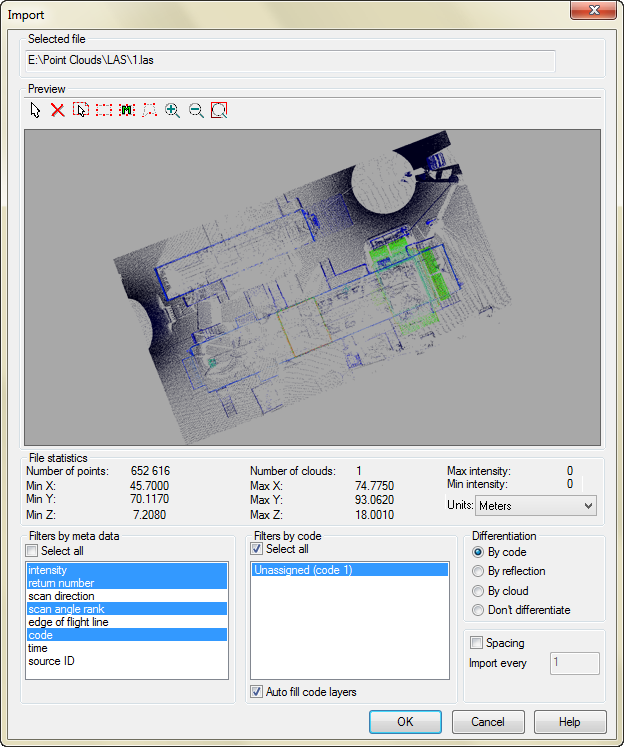
Point Clouds Import Dialogue Box
The Import dialogue box allows you to specify what data to import and how. It gives visual representation of the file’s point cloud and get understanding of the data in the file.
The dialog that opens shows base parameters and visual representation of point clouds in imported file.
Options:
Selected file
Displays the path to imported file.
Preview
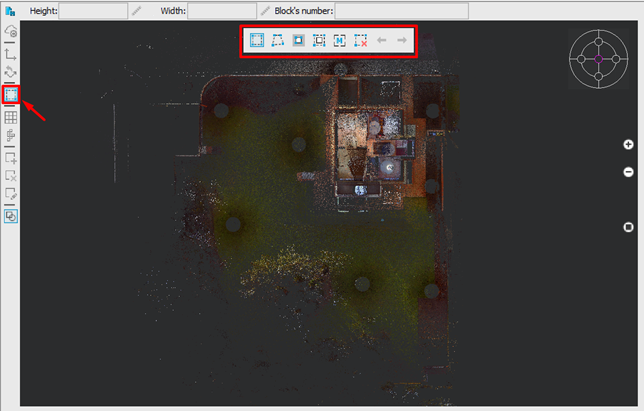
Preview displays all contents of the imported file. You can specify areas to import. By default, all points will be imported, However it is possible to specify one or more areas of diverse geometry instead of loading all file points. To select areas, you must activate the set of area selection tools:
![]() Select area: Select previously created areas for import. To select already specified area, click inside of it.
Select area: Select previously created areas for import. To select already specified area, click inside of it.![]() Delete area: Delete rectangular, polygonal or coordinated selection area. The area to be deleted should be previously selected by Select button.
Delete area: Delete rectangular, polygonal or coordinated selection area. The area to be deleted should be previously selected by Select button.![]() Select All: Select all points in an imported file.
Select All: Select all points in an imported file.![]() Select Volume: Specify one or several rectangular area(s) in preview window to import their content in a drawing. Several areas can be specified.
Select Volume: Specify one or several rectangular area(s) in preview window to import their content in a drawing. Several areas can be specified.![]() Select Volume Manually: Creates a rectangular area using the specified points as diagonally opposite corners. The dialog allows to enter coordinates manually. More than one area can be specified. Initially, the dialog shows boundary coordinates of whole scan.
Select Volume Manually: Creates a rectangular area using the specified points as diagonally opposite corners. The dialog allows to enter coordinates manually. More than one area can be specified. Initially, the dialog shows boundary coordinates of whole scan.
![]()
![]() Select Polygon: Specify one or several polygonal area(s) to import their content in a drawing. Right click to finish vertices specifying. Several areas can be specified.
Select Polygon: Specify one or several polygonal area(s) to import their content in a drawing. Right click to finish vertices specifying. Several areas can be specified.![]()
![]()
![]() Zoom in, zoom out or zoom all preview area.
Zoom in, zoom out or zoom all preview area.
 Select area: Select previously created areas for import. To select already specified area, click inside of it.
 Delete area: Delete rectangular, polygonal or coordinated selection area. The area to be deleted should be previously selected by Select button.
 Select All: Select all points in an imported file.
 Select Volume: Specify one or several rectangular area(s) in preview window to import their content in a drawing. Several areas can be specified.
 Select Volume Manually: Creates a rectangular area using the specified points as diagonally opposite corners. The dialog allows to enter coordinates manually. More than one area can be specified. Initially, the dialog shows boundary coordinates of whole scan.
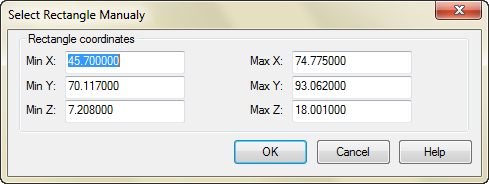
 Select Polygon: Specify one or several polygonal area(s) to import their content in a drawing. Right click to finish vertices specifying. Several areas can be specified.

 Zoom in, zoom out or zoom all preview area.
File statistics
Displays statistic data of imported file.

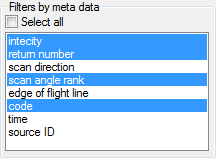
Filters by meta data
Displays all point attributes in imported file. Select those attributes, which should be imported with points in the drawing.
Filters by code
Displays classes of points in imported file. The list is empty if points in the imported file are not classified. Only points of selected classes will be imported to the drawing.
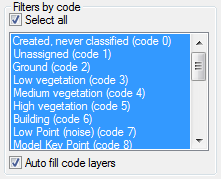
Auto fill code layers
Creates layers with names of classes. Layers named according to LAS standard classification. Each layer get the FC#N description, where: FC# – index number, N – class number.
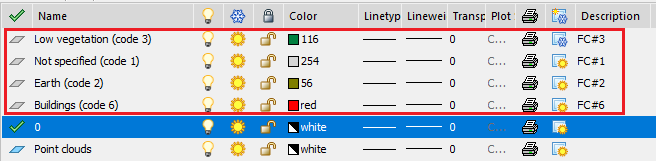
If the Auto fill code layers checkbox is off, then a single layer Point Cloud will be created during the import. The description field of this layer could be filled manually.
Differentiation
Points can be imported as separate clouds. Division criteria are:
- By code: Import points as separate clouds. Each cloud contains points with its code and one cloud with unclassified points.
- By reflection: Each cloud contains points with its value reflection.
- By cloud: Divide points on the number of clouds in file.
- Don’t differentiate: Import one cloud regardless of the cloud number in imported file.
Spacing
Modify point cloud density to manage program performance and visual noise by increasing the number of visible points. Enable Spacing checkbox and specify the ordinal number of the imported point in Import every <…> field.
NOTE: Special option hides separate points to avoid nanoCAD braking. This option is enabled by default. Turn on Display all points in Point clouds – Settings menu to display all points of cloud.
Convert to CS
If DEM was created in WGS-84 system, then convert it to UTM (Universal Transverse Mercator) coordinate system. Also, you can Do not convert DEM, but this parameter is not recommended.
Info: NanoCAD is an easy-to-use, cheap, and yet professional, CAD software tool for Windows, that provides an outstanding user experience by providing high performance, full capability, a classic interface and native.dwg format support. nanoCAD has been built to deliver design and project documentation for all industrial purposes. nanoCAD includes a full suite of basic and advanced CAD tools for 2D/3D design and creating industry-standard DWG-compatible CAD files. Our program supports innovative, collaborative and customizable features to improve your efficiency, and includes a few API’s, allowing anything from routine task automation to complex CAD app development. You may download nanoCad for free, using the links below, and purchase later, in case you like it.
Post your comment on this topic.