
Batch plot
 NanoCAD button – Plot >
  Batch Plot
Menu: File –  Batch plot…
Toolbar: Main –
 Command line: PUBLISH
The command allows you to create and send to print the list of drawing sheets from one or several files both from model space and from layout space. The simultaneous plot of sheets from model space and from layout space is also possible.
For each sheet in a dialog it is possible to specify the page setups, including that different printers can be assigned to different sheets. There is a possibility to sort sheets in the list, add and delete sheets from the list. The formed sheets list (plot set) can be stored for further use.
The Multi-sheet job option allows you to place sheet list in one or more files, for example, when creating *.pdf-files using virtual printers. The order of the sheets in the *.pdf-file corresponds to the order of the sheets in the list.
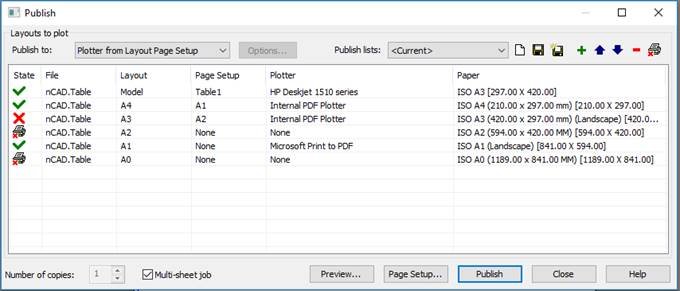
After starting the command, the Publish dialog box opens:
Options:
| Plot to: | |
|---|---|
| Setup | Button to open the dialog box to change the current settings of the selected plot device. The view of opened dialog box and setting parameters are determined by the driver of the current plot device. ATTENTION! When selecting a single plot device for all sheets in the list, the paper size specified in the device settings is ignored. |
| Publish lists | Drop-down list containing the named publish lists available to plot. By default (if there are no publish lists saved by the user) two lists are displayed:
|
| Number of copies: | Specifies the number of copies to publish. |
| Multi-sheet job | Turns on/off the mode to plot sheets to the file, for example, when plotting on a virtual printer. The sheets plot is carried out in the order specified in the dialog box. If the same plotter is assigned to all sheets, all sheets will be placed in one file. When assigning different plotters for different sheets, the plot is carried out to separate files for each plotter. When changing the plotter, a new file is created. For example, if in the dialog box Plotter 1 is assigned to first sheets, Plotter 2 to several next sheets, and Plotter 1 for the rest, then 3 files will be created – two separate files for Plotter 1 and one file for Plotter 2. |
Columns
| State | Column to display the plot status:
|
|---|---|
| File | Column to display the file name. |
| Layout | Column to display the name of the layout tab in layout space. For the model space the Model value is displayed. |
| Page setup | Column to display the named page setup assigned to the sheet. If the sheet does not have an assigned page setup, the value None is displayed. |
| Plotter | Column to display the name of plotter assigned to the sheet. If the sheet has no assigned plotter, the value None is displayed. |
| Paper | Column to display size and orientation of the selected paper. |
 Print sheet.
 Don’t print sheet.
Left double click on the column names separator automatically changes the columns width.
To sort alphabetically by a specific column (parameter), click on the column heading.
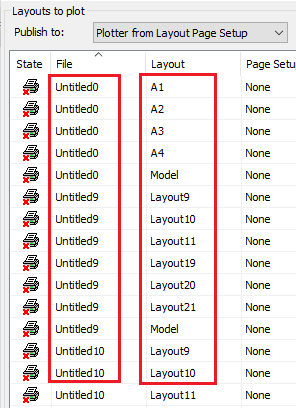
Please note that when sorting the list by file name, layout names are displayed not in ascending or descending order, but in the order in which they are located in their files.
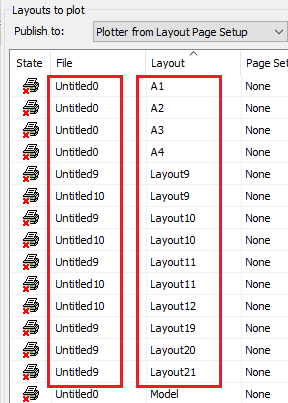
To sort through the sheets in alphabetical order, click on the header of the Layout column.
 |
Current document publish list | Current document publish list |
 |
New publish list | Deletes all layouts from the dialog list to create a new publish list. |
 |
Save publish list | Saves the publish list. Click this button to open the Save publish list as dialog box: 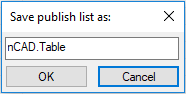 It is possible to set the user name list instead of that proposed by default. After clicking OK button the named list will be saved in the folder: The named lists are saved in files with *.plst extension. |
 |
Save publish list as | Saves the publish lists with a new name. Clicking this button also opens the Save publish list as dialog box, which proposes by default the List name as a new publish list name. If a new list name coincides with the already existing one, after clicking OK button the following message is displayed: 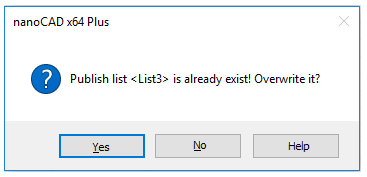 |
 |
Add page to plot | Adds a new page to the list. It is possible to select page for adding to the list only from the documents opened in the editor. Clicking the button opens the following dialog:  In the drop-down lists of the Add page to plot dialog box it is possible to select:
|
 |
Move up | Moves the sheet selected in the list up one position. |
 |
Move down | Moves the sheet selected in the list down one position. |
 |
Remove from the list | Deletes the selected sheet from the list. It is also possible to delete the sheet selected in the list by DEL key. |
 |
Button to open the Plot preview dialog box. The preview of plot results is possible only for the selected sheet in the list. When printing from the preview mode, only the viewable sheet will be printed. | |
 |
Button to open the Page Setup dialog box to specify the plot options. Left double-click on any column of the selected sheet, except the State column, will also open the Page Setup dialog box. | |
 |
Button to start publishing. All sheets with the specified state allowing printed output, will be printed. | |
 |
Button to close the dialog box. | |
 |
Deletes all elements with unspecified plotter from the list. |
To create named publish lists to plot (plot set):
1. Open one or more documents, the layouts of which it is necessary to plot.
2. Start the Batch plot command.
3. When opening the Publish dialog box, the list of all layout tabs available in all opened documents is formed automatically. The following order of the layouts in the dialog box is set by default:
· the first displayed in the list is a document from which the Batch Plot command was started, it is followed by documents in order of their tabs in the graphic editor window (from left to right);
· the first displayed in the document is the Model tab, followed by Layout1, Layout2, A4, A3 tabs, etc.
4. To edit the list:
· to remove layouts unnecessary to plot, select the sheet in the list by left click and click Remove from list button or press DEL.
· to change the order of layouts, use the Move up and the Move down buttons.
5. To specify the plot settings for each page, click the Page Setup button (left double click on any selected layout column, except the State column, also opens the Page Setup dialog box).
NOTE: Use of previously created named sets of page setup in this case will allow you to reduce the time of parameters settings.
6. Click the Save publish list button.
7. Enter the list name in the Save publish list dialog box.
8. Click OK button to save the list.
9. Click the Close button to close the Publish dialog box.
NOTE: When saving a plot setting for each layout, name and location of the file it belongs to are stored in the list. Selection of a named list of layouts to plot in any opened file and left double click on any column of selected layout, except the State column (or clicking Page Setup button) automatically loads the file to which this layout belongs, provided that the path to file has not changed.
To edit the publish list to plot:
1. Open the document.
2. Start the Batch plot command.
3. In the Publish dialog box select the necessary list in the drop-down Publish lists list.
4. Make necessary changes in the list (change the layout composition or page setups).
5. Click the Save publish list button.
6. Click the Close button to close the Publish dialog box.
To rename the publish list to plot:
1. Open the document.
2. Start the Batch plot command.
3. In the Publish dialog box select the necessary list in the drop-down Publish lists list.
4. Make necessary changes in the list (change the layouts composition or page setups).
5. Click the Save publish list as button.
6. Enter a new list name.
7. Click OK button to save the renamed list.
8. Click the Close button to close the Publish dialog box.
Features of the Batch Plot from the Model Space
For the batch plot from the model space:
1. Start the Page Setup Manager.
2. In the opened dialog box, click the New button.
3. In the New Plot Set dialog box, enter the set name, for example, A4 Portrait.
4. Click OK button.
5. In the opened Page Setup dialog box, select printer, paper size – A4, paper orientation – Portrait, set the plot scale and other plot options.
6. Set by the Window the 1-st plot area of A4 format, then the 2-nd and all other plot areas of A4 format  Add window print area button). To delete the last specified plot area, use
  Delete last print area button. The Preview button allows you to see a preview plot result of the selected areas. The preview option can be used at any stage of setting plot areas.
7. After setting the last plot area of A4 format, to finish the procedure of creating page setup set of A4 Portrait, click OK button in the Page Setup dialog box.
ATTENTION! When forming the name set of page setups for batch plot from the model space, it is necessary to include all areas of corresponding format to be printed.
8. Click the New button to create the next page setup (for example, A3 Landscape) in the same way.
9. Repeat the procedure to form all the other plot sets (for example, to create sets A2 Portrait, A1 Landscape, etc.).
10.After specifying the last plot set, click the Close button in the Page Setup Manager.
After creating all named sets of page setups of the model space, it is possible to start the batch plot.
For the batch plot of the created name sets of pages setup:
1. Start the Batch Plot command.
2. In the Publish dialog box, click the New publish list button to clear the current list.
3. Click the Add page to plot button.
4. In the opened Add page to plot dialog box:
· in the drop-down Document list select a document (if the batch plot is performed for multiple documents at once);
· in the Layout list select Model parameter (displayed by default when plotting from model space);
· in the Page setup list select the A4 Portrait parameters set.
5. Click OK to add selected name set in the plot list.
6. Click the Add page to plot button to add the next set (for example, A3 Landscape).
7. Add similarly the rest parameter sets (for example, A2 Portrait, A1 Landscape etc.).
8. To send the formed set to plot, click the Publish button.
Info: NanoCAD is a simple, inexpensive, and yet powerful, CAD platform for personal computer, that delivers a great user experience by providing enhanced performance, full capability, a classic interface and native.dwg format support. nanoCAD has been built to deliver design and project documentation for all industries. nanoCAD includes a full suite of basic and advanced CAD tools for 2D/3D design and creating industry-standard DWG-compatible CAD files. Our tool supports groundbreaking, collaborative and customizable features to improve your efficiency, and includes several API’s, allowing anything from routine task automation to complex CAD application development. You may download nanoCad for free, using the links below, and buy later, if you like it.
Post your comment on this topic.